Pages

Showing posts with label nail art. Show all posts

Skittling the purple

Monday, October 3, 2011

Hi everyone! Boy, Uni life sure is hectic even during a break. I finally completed my second assignment for the break and guess what? I have a third one to do. Yipee! :( My life will be absolutely crazy until November 25th, which is when my last exam for the year is scheduled to be. So until then, what with assignments, prac and exams, I have no idea how often I will be painting my nails, let alone updating this blog.

Whining over, on to the nails :) I went for purple this time but I'm not sure I like what I did.

purple nail art skittle1

I applied two coats of Sportsgirl Baby elephant onto my index and fifth fingers. It is a greyed out purple with a lovely shimmer - beautiful! For my thumb and middle finger, I applied two coats of OPI Parlez-vous OPI?. Decorated my thumb by placing some 3D objects on it and using my Glossyblossom nail art striper in white for the white lines on my middle finger. Zoya Dannii was applied on my fourth finger and also used to dot the flower on my middle finger.

purple nail art skittle2

My friend gave me some of the flat 3D decorations to play with for my birthday. She knows me too well ;)

purple nail art skittle3

What do you think of this mani?

Thanks for looking ^^
~Sharon

Sally Hansen Salon Effects Girl Flower

Friday, September 16, 2011

Good morning, Dear Reader!

As planned, I'm kicking off my forties today wearing Sally Hansen Salon Effects Nail Polish Strips in the Girl Flower pattern.  There have been a few questions in recent weeks regarding whether a given age is too old for a particular look, and I think the nail strips give a pretty clear picture of my position on that.

In using various Salon Effects strips, I'm finding that there's variance in the durability of the strips, and the Girl Flower strips seemed a little more delicate than others I've used.  Once I realized that making a little tear in one of the first, I was just more careful in peeling them and didn't have any noteworthy problems.  I applied these to bare nails, no base coat at all, and bare nails seem to be preferable.  I didn't have the application nightmare I did last time, there weren't problems today, so it's fair to say the one tough application was a result of error on my part coming from being tired out. There's one thing I finally thought of doing when it mattered that might be worth passing on: I always start with my left hand, and I remembered to skip my left thumb so I could use that nail to peel the strips for my right hand, which is easier than peeling with a freshly decorated nail.  After applying the strips I added top coat to them to seal them and shine them up.  Here's my Girl Flower manicure.

Sally Hansen Salon Effects in Girl Flower
Sally Hansen Salon Effects Nail Polish Strips in Girl Flower

I love this.  My index nail always has a kind of messed up spot at the end of my nail bed because of the curve of my nail, but that doesn't show at all without magnification.

That's my forty-year-old's Girl Flower manicure, and I'm off to have one really good day.  Until next time, Dear Reader, love and nal polish to you!


All Rights Reserved, Siobhan@The Nailphile. If you're reading this elsewhere, it's stolen from a real nail polish blog.

Honk if you love OPI - DS Original

Tuesday, September 13, 2011

Honk if you love OPI is from the Touring America collectionA gorgeous blackened berryI free handed some sadly misshapen v french tips and my ring finger with DS OrigionalI love blackened shades like this where you can easily in any light tell the color but it's so very deep and vampy stillI used 2 coats of Honk if you <3 OPI and one of DS OriginalVampy and holo is a favorite combo for it they

Yet another spring mani ^^;;

Thursday, September 8, 2011

Hello lovelies~ I'm totally on a roll with these spring-inspired manis :P Can't help it, it's September and springgggggggg :D Although it was a tad cooler today and cloudy. Hopefully the sun will come back soon!

ready for spring1

I applied two coats of Ulta3 watermelon onto my index and fifth fingers and then used Ulta3 lily white for the dots. Two coats of Zoya Tiffany was applied onto my fourth finger. For my middle finger, I applied two coats of lily white and layered on two coats of Jordana Disco days. Finally, I applied two coats of Ulta3 spring fling onto my thumb and dotted with lily white. For some extra sparkle, I applied one coat of Disco days.

ready for spring2

I don't usually wear orange shades so I thought I'd try it out again, especially since it's (meant to be) getting warmer. What do you think of orange on your tips? Also, have a look at my Blog Birthday giveaway, it's ending in 10 days!

~Sharon

Spring has arrived!

Saturday, September 3, 2011

Hello lovelies~ Spring has arrived here in Australia and so what better way to celebrate this than to bring out the pastel polish shades? :) I saw 'chelle's awesome pastel mani and was inspired to create my own. I don't have any flower fimos so I used my dotting tool to paint some myself ^^

spring pastels1

Boy, I used soooo many nail polishes for this mani. All stripes were applied with Glossyblossom nail art striper in white. Here's the whole list!

Pinky: base - two coats of Ulta3 spring fling; flower - Ulta3 watermelon, spring blossom
Ring: base - two coats of China Glaze Light as air; flower - Color Club Uptown girl, Ulta3 spring blossom
Middle: base - three coats of China Glaze Re-fresh mint; flower - Misa Dirty sexy money, Ulta3 spring blossom
Index: base - three coats of Ulta3 spring blossom; flower - mix of Ulta3 spring blossom & spring fling
Thumb: base - two coats of Ulta3 spring shower; flower - China Glaze First mate, Ulta3 spring blossom

spring pastels2

spring pastels3

How fitting is it that half the polishes I used had 'spring' in their name? :) I am so, so, soooo in love with this mani ♥♥ I keep staring at my nails-eeeeek! Hehe, I love my pastel polishes and totally need to own more of them. What do you think of pastel shades? :) And, have a look at my Blog Birthday giveaway as well if you haven't already!

~Sharon

LCN Magnetic Polish fun

Saturday, August 27, 2011

I was given the opportunity to try LCN Magnetic polishes and they are so fun!This is the kit I was sent...The magnets are great! One is the star and the other stripesI used Fuschia Attraction and Green Temptation and both magnetsI alternated the magnets because well I like it that wayThese polishes are straight one coat colors, no layering needed. I love that!This was my first try using these so

Dark Angel and her Stardust

Tuesday, August 23, 2011

I received the sweetest RAOK (random act of kindness)a couple of weeks ago from Jennifer of  The Polished Pirate Blog, she sent me a little pretty that's been on my wishlist for a while....MAC's Dark Angel! YAY I know the color isn't anything all that unique and I'm not big on MAC's formula but I NEEDED this one because of the name....it was meant to be mine! Thank you so much Jennifer, I love

Spring flowers

Monday, August 22, 2011

Hi ladies~ Sorry for the brief absence, I'm still struggling through my pile of assignments! Why is it that they never end? :( I still haven't painted my nails - it's moving onto two weeks of naked nails now, woah! And so this post features a mani from the good old vault :)

I started off with two coats of China Glaze Re-fresh mint. I then used my dotting tool for the white dots (Ulta3 lily white) and mixed Ulta3 silver pink with lily white to create the pink flowers on my accent nails. Placed some rhinestones and pearls and voilà, spring flower look complete. It's not quite spring here yet, but hey, I can look forward to it, yes? :P

spring flowers1

spring flowers2

I'm hoping to get back into the rhythm of posting more often once this hectic week ends. Meanwhile, have a look at my Blog Birthday giveaway ^^

~Sharon

OPI has got THE Blues

Friday, August 19, 2011

I had the urge for blue the other day so I grabbedNicole by OPI It's not me it's Blue and OPI Road house Blues from the Touring America CollectionI was feeling polk a doty so I played with contrasting dots on all my fingersI just used my smallest dotting tool and got a little randomHmmmm....My ring finger has dots of It's not me it's blue all the way up the outer side but the lighting makes it

The Neon Creeper Heel Manicure

Good morning, Dear Reader!

After a few days of no polish change, I was up for a more involved mani this morning, so I did a nail art interpretation of a T.U.K. high-heeled neon creeper.  Why yes, that is incredibly random and out of the blue, but when you see the shoe, you'll see why it inspired a manicure.

The backstory, to mitigate some of the randomness, is that I need a new pair of all-purpose, running out the door shoes.  I've mentioned my taste in clothing is pretty plain, but my taste in shoes is far from it, with the current worn-out pair being red/purple/pink mosaic flats.  I've always loved heels, and being kind of short I wore them just about all the time for years (I'm still a normal height for a woman wearing them, and if there's no good reason not to...).  That era ended when I completely tore an ankle ligament (I was pledging a sorority and fell on the first step of the house's spiral staircase, smashing my ankle on every step on the way down,  while everybody was waiting for me at the bottom - my grandest entrance ever), until I just recently discovered shoes with a platform.  They look impossible to walk in, but they're totally comfortable and nothing at all to walk in, so heels are back on the table for me, and they've been included in the hunt.

That brings us to the inspiration picture,which I mentioned was a pair of T.U.K. neon creeper heels.


Mani Inspiration
My Manicure Inspiration

To make the manicure, I started with three coats of China Glaze Kiwi Cool-ada, stamping plate H9 for the leopard print, which is a larger pattern and let me cover each nail with only one stamp.  I used that XL stamper I tried once before and hated because I've read reviews from a few bloggers with whom I normally have a similar experience who loved it.  That made me think I needed practice, and that proved to be the case.  There is a trick to using it, which is absolutely no pressure picking up or placing the stamp, and then it does a really beautiful job.  Having stamped, I filled in the dots on the leopard print with Misa Dreamy Purple, painted the tip one nail with Dreamy Purple to make it like the top of the shoe, then sealed with top coat.  Here's how it turned out.


Neon Creeper Heel Mani
My Neon Creeper Heel Manicure

There's not fabulous light today, so Dreamy Purple looks darker in the picture than in real life, although I think I should have hunted down Nubar Pasadena Purple for this one - it would have been more clearly purple.  I'm still really happy with the manicure because it's ridiculously fun.

That's my new weekend manicure and just about all I have to yap about this morning Dear Reader, so until next time, love and nail polish to you!


All Rights Reserved, Siobhan@The Nailphile. If you're reading this elsewhere, it's stolen from a real nail polish blog.

I have found nail art awesomeness....come meet her

Tuesday, August 16, 2011

I got the sweetest email the other day from Robin Mosesjust a I read your blog would you take a peak at my nail art kind of email, very sweet and with pictures...I like pictures! but these pictures are of nail art....not typical flowers and konad but this....I think I'm in love here people....look at theseDid you just pee yourself? I know you did!This girl is freaking amazing...like come live

OPI A Color to Diner for

Monday, August 8, 2011

This is a gorgeous shade from OPI's Touring America Fall 2011 collectionI know most people describe it as a berry, or wine and in the bottle it kind of is...on me it's a gorgeous red that when the light hits the fuchsia shimmer turns to a lovely red wine shade.See now it looks more wine toned and the hidden shimmer peeks outI added a little of the mylar flaky glitter from Born Pretty Store to my

Spicing up the black

Hey lovelies :) I was in the mood for a dark mani a few days ago and so reached for my black nail polishes. Not wanting a pure black mani, I used some layering polishes to spice it up a bit and here is the result!

black mani1

I applied one coat of Ulta3 black satin onto my nails and then layered with China Glaze White cap and OPI Servin' up sparkle. Onto my accent nails, I applied two coats of Orly Matte vinyl and decorated my fourth finger with some stars, pearls and rhinestones from the nail art etailer Born Pretty Store. I felt the star was fitting as the mani gave me a spacey feel. How's that for a shooting star attempt? :P

black mani2

A couple of photos in the sun to show the bling and glory of Servin' up sparkle :) I love these holo glitters ♥

black mani3

black mani4

It's not much, but I like it for it's simplicity and prettiness. Don't forget to enter my Blog Bithday Giveaway here :)

~Sharon
Some products were provided for review. For more information, please view my disclosure policy.

FingerPaints To-teally Chic & Konad m63

Thursday, July 28, 2011

Good morning, Dear Reader!

Today I went with another from the FingerPaints Fall Fashionista Collection, To-teally Chic.  It the teal creme, as the name implies, and I used two coats for perfectly smooth, opaque, shiny goodness.  After it had dried, I stamped it with the ribbon-y pattern from Konad plate m63 in Konad White Pearl Special Polish.

My stamping fell a little short of my usual standards, I think because of the humidity.  Everything through picking up the stamp was business as usual, but applying the stamp, the polish stuck to the stamper and only about half of it transferred to my nails with the other half staying on the stamp.  Some polishes have done that before, but White Pearl never has and it's a color (and particular bottle of that color ) which gets plenty of use, so it seems like it has to be an outside factor.  Since I was left with light image on the stamper after applying, rather than double stamp to cover the small edge that was left bare, I just applied leftover bits from the stamper to fill it in.  Some came off, some stayed stuck, but I was able to finish the mani that way.

FingerPaints To-teally Chic with m63
FingerPaints To-teally Chic Nail Polish with Konad Plate m63

See?  Not great, but not awful.  If I'd managed to make super clean stamps, in which case I would have done a careful double-stamp to fill in rather than a half-assed job of using stamper leftovers, this one could have been really striking, I think.  I'll have to give it another shot after either the weather lightens up a bit or I figure out a workaround.

That's today's near miss of a manicure, so until next time, Dear Reader, love and nail polish to you!

Some more purple for you :)

Tuesday, July 26, 2011

Hey everyone~ You know I love purple, I know I love purple and so of course, here's another purple mani :P I loved my blue mani so much I decided to recreate it, purple style. First photo is taken under direct sunlight, the rest indoors with natural lighting.

purpleeee1

I thought I'd spice up the mani with a few 3D accessories. Besides the silver rhinestone, all were from the cheapest nail art etailer Born Pretty Store. They have such amazing nail art supplies, from thin nail brushes to stamping plates - and all with free shipping too! Check out the discount coupon on my sidebar for a further 10% off their already cheap prices - just type in PIJ31 into the respective spot when you check out.

purpleeee2

Look at how the heart decals shine and flash from purple to blue to green to gold...it's beautiful ♥ These heart decals can be purchased from Born Pretty Store as part of a set of 12 with various other designs provided. Check out the rest of the nail art glitter decoration here :)

purpleeee3

The polishes I used in the mani are:
China Glaze Light as air
Ulta3 lily white, twilight fever

Twilight fever definitely looks like another Chanel Paradoxal dupe. What was once a rare thing to come across in Australia has become too easy, I think Australis also have a dupe and I also own a Sportsgirl dupe. I might post a comparison of it with twilight fever later.

purpleeee4

I actually love this mani so much I'm still sporting it after 3 days and going strong... :P Definitely a record for me! What do you think of it? :)

~Sharon

Some products featured in the post were provided for consideration.
For more information, please see my disclosure policy.

Konad Sky Pearl Special Polish & m63

Monday, July 25, 2011

Good morning, Dear Reader!

This morning I did a manicure that came to mind the other day when I came across my Konad Sky Pearl Special Polish, and it turned out really well.  Not perfect, but I like it well enough that I don't especially care that it's imperfect.

I started out with Orly Frolic, the lovely two coat purple creme, which I thought would look really cool with Sky Pearl stamped over it.  For the pattern to stamp, I used the swirly one from Konad plate m63 that looks a lot like water marbling.  Since I liked how it was coming out off the bat, I used a coat of Konad top coat to prevent any smudges prior to finishing it off with Poshe.  Here's Orly Frolic with m63 in Konad Sky Pearl in the sun.

Konad Sky Pearl Special Polish
Konad Sky Pearl Special Polish over Orly Frolic with Konad Plate m63

You can see the the pearl finish in the Special Polish is very subtle - this is in sunlight, and the shimmer doesn't really show otherwise.  What I like about the Konad Pearl polishes (Black, White, Sky, Violet, ...) is that they don't seem to smudge anywhere near as easily as the cremes and they make exceptionally crisp stamps.

That's all for today, Dear Reader, so until next time, love and nail polish to you!

Sephora by OPI Nail Art Decals

Sunday, July 24, 2011

Good morning, Dear Reader!

Today's manicure seemed like a good opportunity to give you a closer look at Sephora by OPI nail art decals, so that's just what I have in store.

I started out with the intention of a hot weather manicure, and the first polish that appealed to me for that was Misa Sandals, Flip Flops and Hip Hop, which is kind of an red-pink-coral neon creme.  It took three coats of color, which is pretty good for a neon.  It's really pretty on its own, but just a bit plain, so I went looking for something to spruce it up a bit and ran into my Sephora by OPI Hello Kitty nail art decals.  I specifically recall how impressed with their quality I was when I last used them, and since I see Sephora is offering a greater variety of nail art decals now, I thought I'd show you just what I found to be so impressive about them.

I used a total of three decals from two packs on an accent nail, which is a little much, but this manicure really turned into a decal demo.  The three I chose were a rhinestone flower, a butterfly with a trail of tiny rhinestones behind it, and a plain Hello Kitty Face, and I chose those three to have one of each type (only rhinestone, with rhinestones, no rhinestones).  To apply them, for each I loosened the decal from its paper backing by bending the paper to expose an edge, used an orange stick to lift the decal up by the just-freed edge, lining it up just above the nail, then placing it with the orange stick and patting it down.  The last step was to gently press each down with a right-hand finger, then I sealed them with a coat of Revlon Color Stay Top Coat and one of Poshe.  I took close-up pictures from several angles that are really not the most flattering of either my nails or the manicure, but their purpose is to illustrate how perfectly smooth the decals lie on the nail, so that's what we're looking for here.

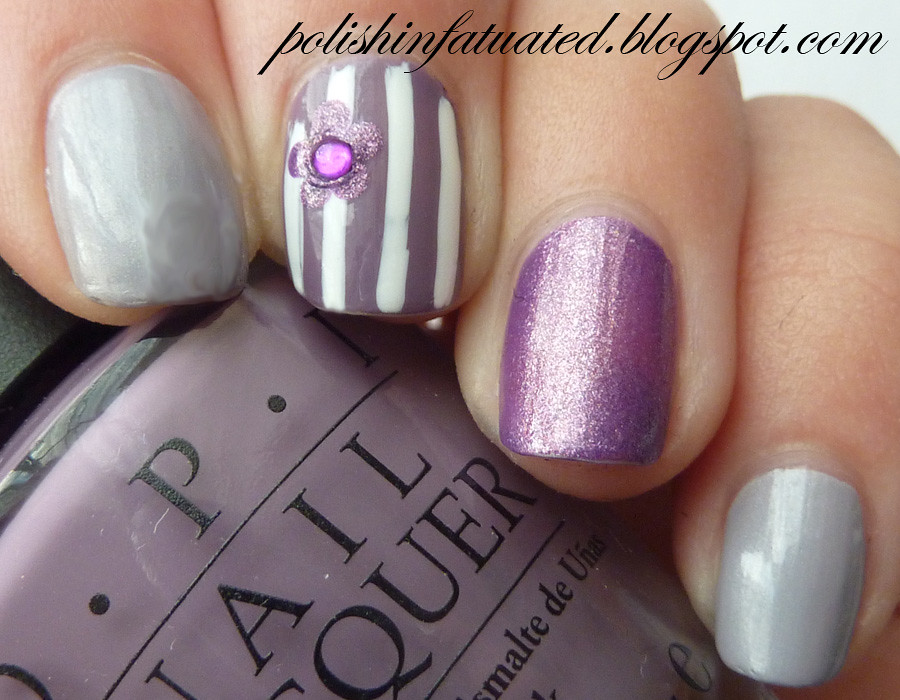
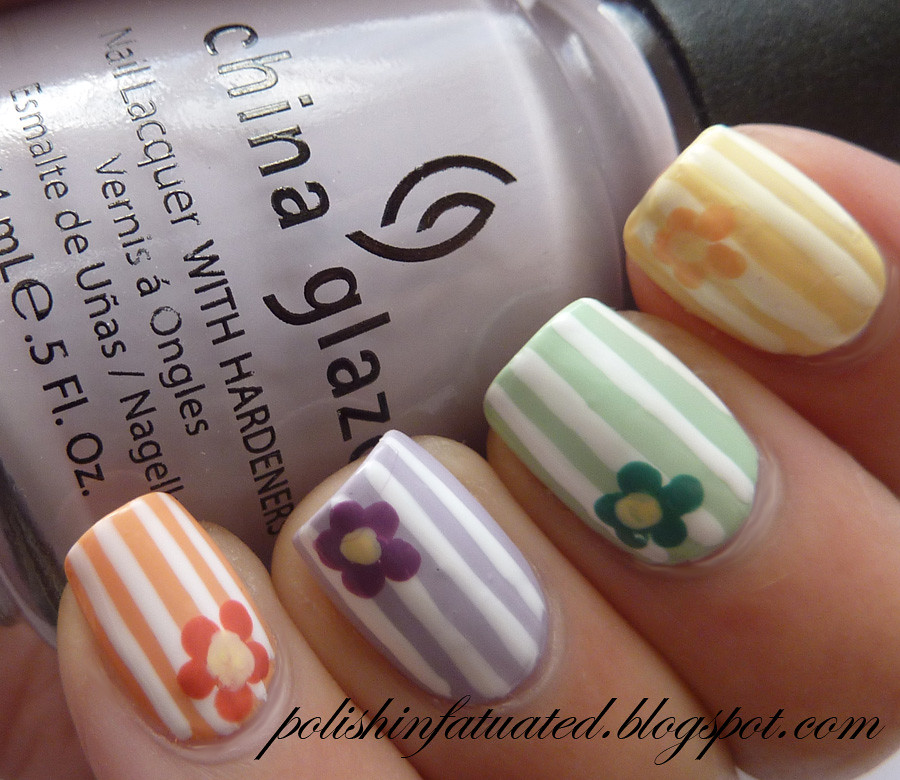
First, the whole manicure.  Here, you can get a sense of how easy the Sephora by OPI decals are to work with - they don't stick to things or get bent when I remove them from their backing, and they're very, very thin so they shape to the nail nicely when they're placed.

Sephora by OPI Nail Art Decals
Sephora by OPI Nail Art Decals over Misa Sandals, Flip Flops and Hip Hop Nail Polish

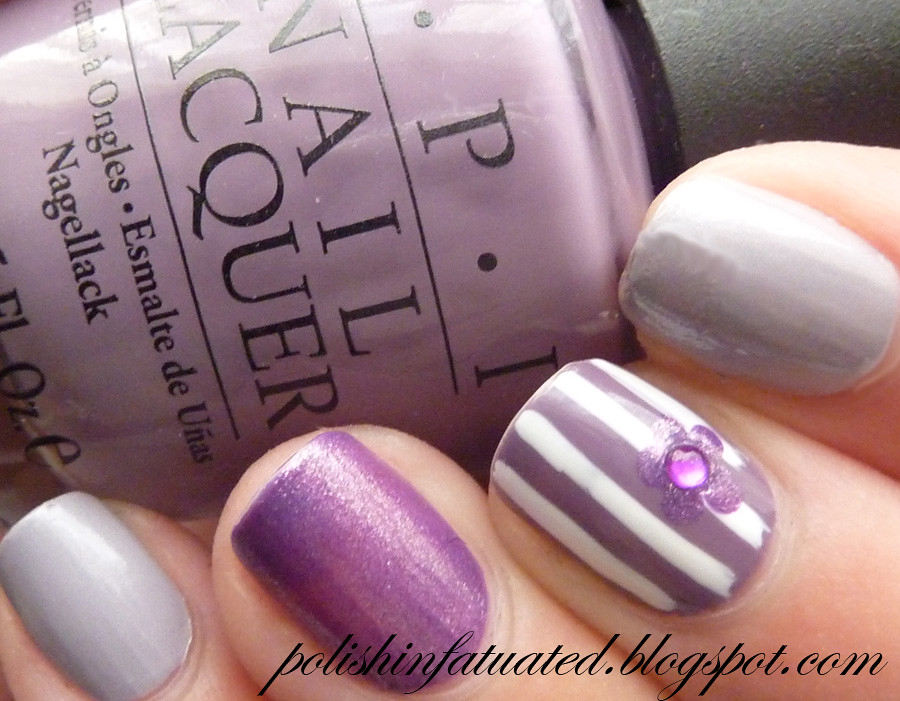
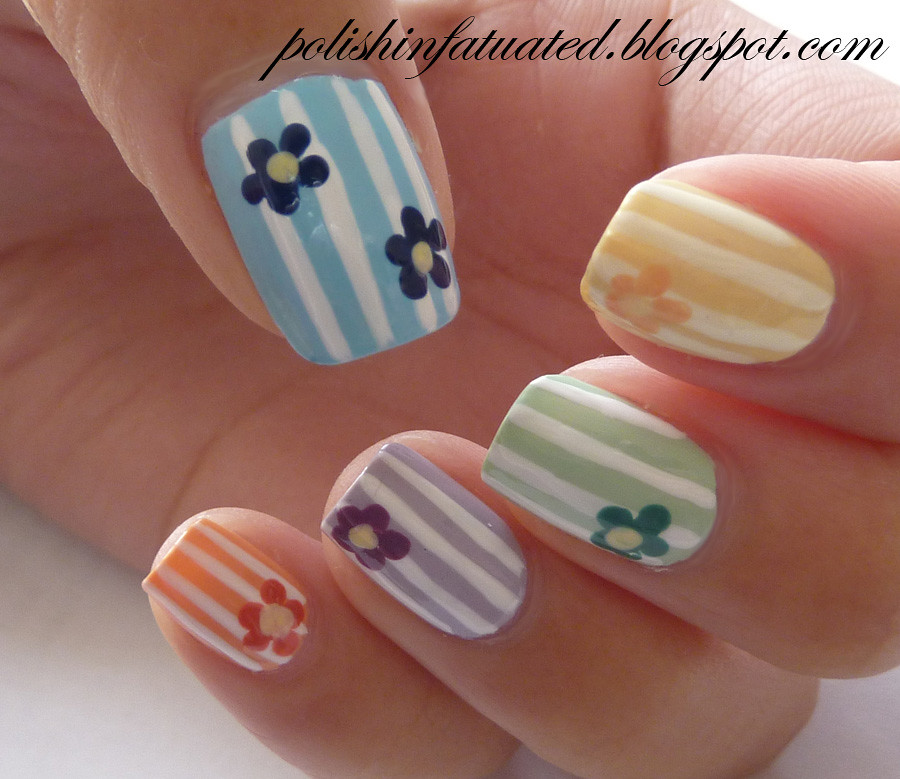
Here, the accent nail is pointing at the camera so you can see how flat the decals lie across a curved nail, so they don't catch or snag on anything.

Sephora by OPI Nail Art
Sephora by OPI Nail Art Decals Lying Very Flat


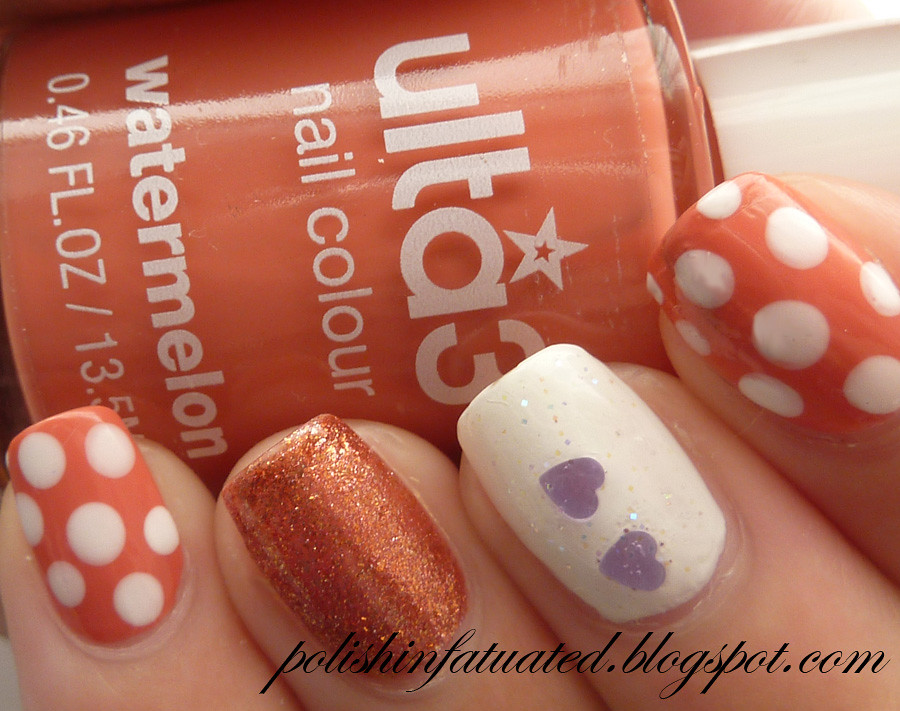
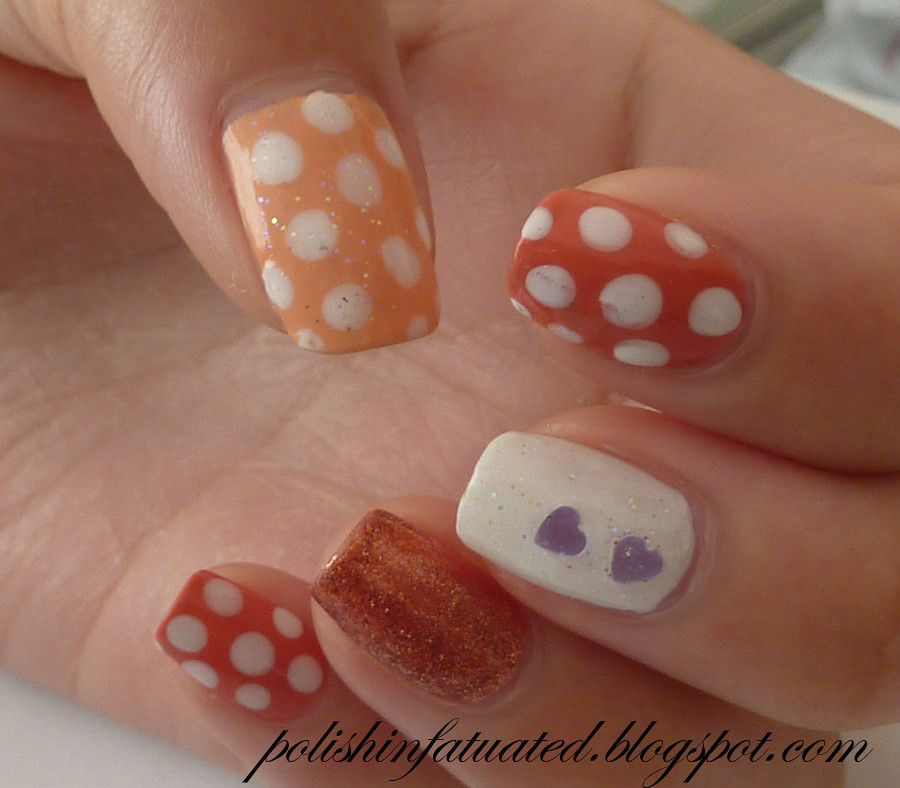
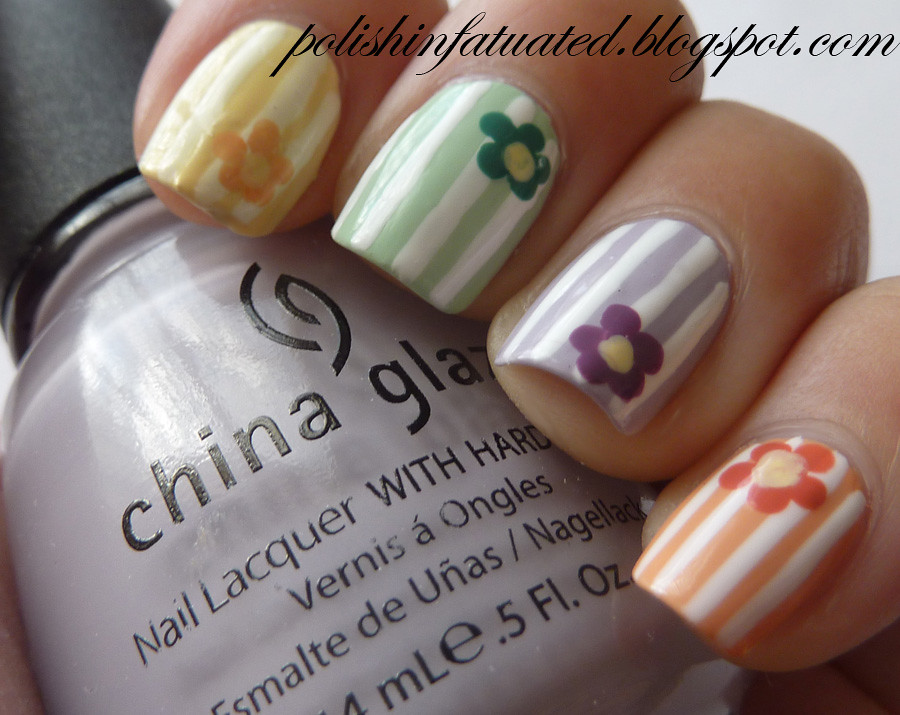
These two side views illustrate the same point with a better view of the rhinestones, which are often problematic in decals and are not here.

_Sephora by OPI Nail Decals
Sephora by OPI Rhinestone Flower and Hello Kitty Nail Art Decals

Sephora by OPI Decals
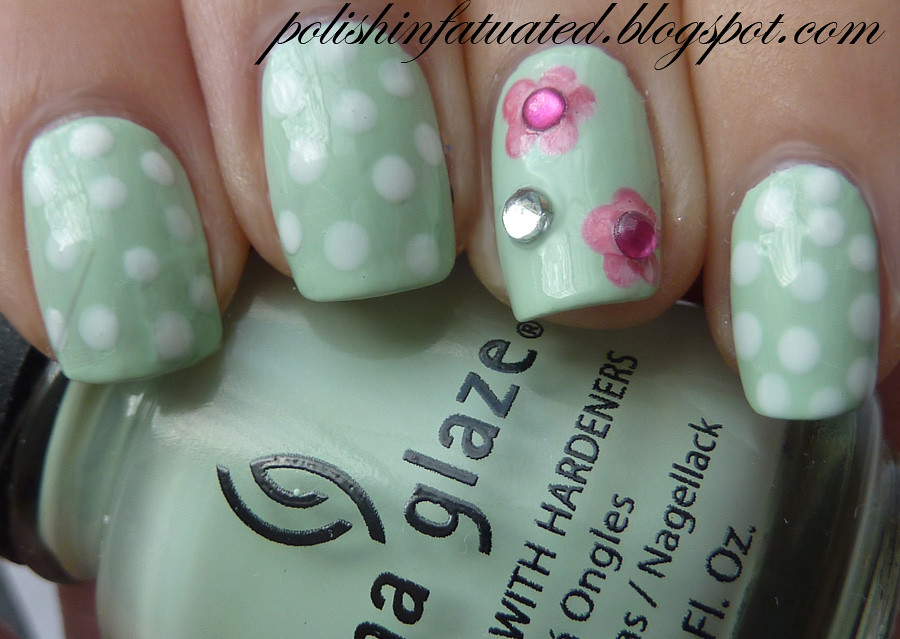
Sephora by OPI Rhinestone Butterfly and Hello Kitty Nail Art Decals

I have no idea why I didn't notice that the last picture was 90° off from the others until this very moment, maybe because my finger's going in the opposite direction.  That's okay, I trust that it shows the same thing...

I bought these because, well, they were $5 and had both rhinestones and Hello Kitty .  When I opened them, I felt a little ripped off at the little sheet of decals for $5, and how having used them twice, I've completely reversed that sentiment.  Most decals (with the exception of Konad's, which I've mentioned how much I like)) are a fight for me to apply without messing up a nail, then about 90% of the time the decal flattens back out and the edges of it pop up off my nail after top coat and before they're dry, so all they accomplish is completely destroying a manicure.  I haven't shown you many (if any) stick-on decals in almost three years, and I have used them a handful of times only to have such a complete failure that I didn't leave it long enough for a picture.  So for me, that means for my $5 I can have five larger packs of decals that don't work, or one small packet of decals that are very easy to apply and wear.

More Sephora by OPI Nail Art Decals are on my wish list because they're such a handy little addition to a manicure, so when the day comes that I have others, I'll give you a look.  Until next time, Dear Reader, love and nail polish to you!

Konad Olive Green Princess Polish

Saturday, July 23, 2011

Good morning, Dear Reader!

I like my Sally Hansen Creamy Olive manicure so much that I just added to it today, and I used plate XL A with Konad Olive Green Princess Polish to do it.  My stamping job wasn't perfect, nor was my cleanup (I erred on the side of removing too much), but I figured I'd give you a look at Konad Olive Green just the same because it's a great Fall shade and seems to lend itself to stamping over a lot of the Fall cremes.

Here, I stamped using the regular Konad stamper (I keep meaning to break out the XL one for another try, but never remember until I'm tidying up a spot that the regular stamper missed) and Konad Olive Green Special Polish, then sealed the stamping with Konad Top Coat and then a coat of Poshe to dry it.  Here's the finished manicure in the sun, and my pinky nail is the best one to really show stamping.

Konad Olive Green Princess Polish
Konad Olive Green Princess Polish over Sally Hansen Creamy Olive Nail Polish

The places where stamps overlapped and the over-cleaned spots show up clearly here in a blown-up picture, but just walking around it looks fine.  Frankly, these are the ones that drive me nuts because the picture shows a pretty jacked up manicure while it looks cool when I look at my hands, which is why I suggest using the pinky, the only one with a completely clean stamp, to evaluate how the polish and stamp really look when properly executed.

I like the two colors together quite a bit, but I think the pattern is a little too small and busy for this particular combination.  I recently broke out quite a few Konad polishes that have been out of rotation for a while, so that might just bring about more Konad manicures in the coming weeks.

That's my olive green manicure and just about all I have to tell you about this morning, so until next time, Dear Reader, love and nail polish to you!

DIY nails contest from StyledOn

Saturday, July 16, 2011

I wanted to share this fantabulous contest with you all:
Contest: StyledOn Hard as Nails DIY Summer Contest sponsored by Hard Candy and China Glaze
What: It's DIY Nails Time! Show us your best DIY nails and win. Upload an image of your best DIY nails and the grand prize winner wins $150 and a Hard Candy or China Glaze gift set featuring their newest collection! You will also be featured as a

Australian Series: A bit of drag marbling

Wednesday, July 13, 2011

Hi everyone~ This mani was initially meant to be a water marble but the nail polish refused to work together and so after spending ages finishing one hand, I gave up and decided to drag marble instead. I don't know why I didn't do this in the first place, it's so much easier and the polish shades worked really well together! Below I have two thick coats of Australis Peek-a-boo, a beautiful blue-toned pastel purple. I then added three dots of Ulta3 gold rush fever to drag marble with. I love how well the purple and gold shades came together ♥

peek-a-boo nail art1

Peek-a-boo is slightly thicker than other polishes but since it's so opaque, you can really get away with one coat if you're careful with application. Gold rush fever isn't a gold I would normally wear on its own, only because it'll clash horribly with my skin tone. Marbled with purple though, it looks amazing. I never knew gold and purple would look so well together. I'm definitely going to try more combinations of them in the future! :)

peek-a-boo nail art2

Australis nail polish retail for $7.95 and can be purchased at Big W, Kmart, Priceline and Target. Ulta3 nail polish are available at Terry White Chemists, Blooms the Chemist, Good Price Pharmacy and other selected pharmacies.

peek-a-boo nail art3

Ahh, I love how much simpler drag marbling is compared to water marbling. What do you think of it? Have you tried it before?

~Sharon

Products provided for review. For more information, see my disclosure policy.
 
My Ping in TotalPing.com

Most Reading